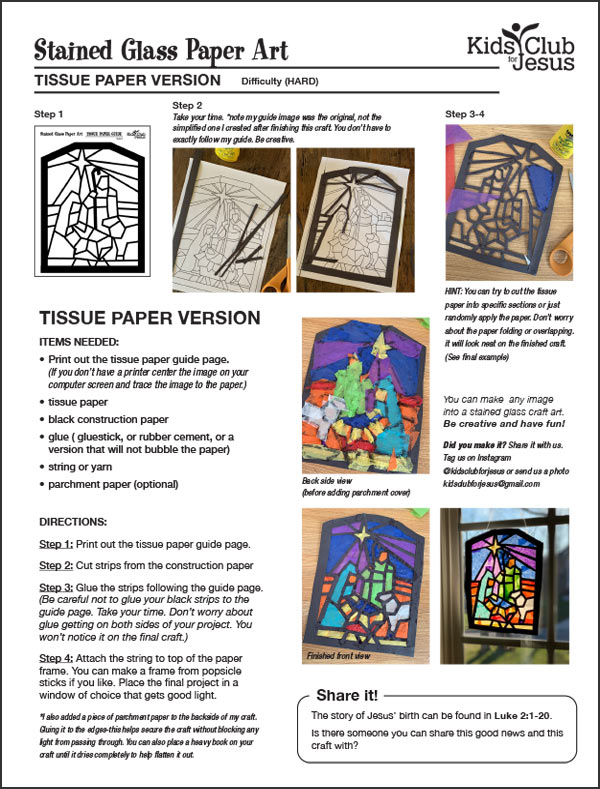
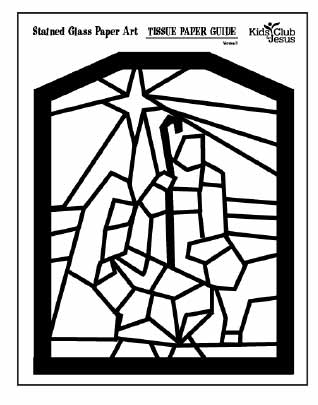
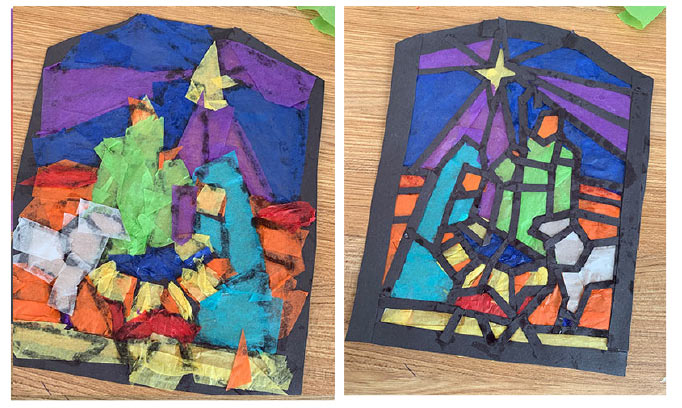
Facebook

Create a “stained glass” nativity scene using tissue paper.
Two different difficulty levels of this craft. We have a coloring version (easy) and a tissue paper (difficult) paper version that will take you longer and can be a little challenging for younger crafters.

In this craft we are recreating a scene from Jesus’ birth. You can read about it in Luke 2:1-20.

COLORING VERSION

Difficulty: (EASY) Ages 10 under

Supplies Needed:

  • Print out the coloring version page. (If you don’t have a printer center the image on your computer screen and trace the image to the paper.)
  • colored pencils, crayons, markers, etc.
  • scissors
  • string or yarn
  • tape
  • popsicle/craft sticks or small sticks (optional)
  • glue (optional)

Directions:

  1. For the coloring version–color the different sections of the stained glass art however you want.
  2. Cut out the image.
  3. (optional) Use popsicle sticks, craft sticks or even regular wood sticks to make the frame for the picture by gluing them around the edge of the finished colored art.
  4. Attach the string to top of the wood frame and hang it in a window or on the wall.
    Share it with a friend or family member.
Step 1
Step 2 (example coloring)
Step 3 (*Optional - added border)

TISSUE PAPER VERSION

Difficulty: (HARD) Ages 11 up

This requires a little more time and patience than the coloring version–but the end result is beautiful!

Supplies Needed:

  • Print out of the template guide page. (If you don’t have a printer center the image on your computer screen and trace the image to the paper.)
  • tissue paper (assorted colors)
  • black construction paper
  • glue ( gluestick, or rubber cement, or a
  • version that will not bubble the paper)
  • string or yarn
  • parchment paper (optional)

Directions:

  1. Print out the tissue paper guide page.
  2. Cut strips from the construction paper. (these can vary in thickness)
  3. Glue the strips together following the guide page. (Be careful not to glue your black strips to the guide page. Take your time. Don’t worry about glue getting on both sides of your project. You won’t notice it on the final craft.)
  4. Attach the string to top of the paper frame. You can make a frame from popsicle sticks if you like. Place the final project in a window of choice that gets good light. *I also added a piece of parchment paper to the backside of my craft. Gluing it to the edges-this helps secure the craft without blocking any light from passing through. You can also place a heavy book on your craft until it dries completely to help flatten it out.
    Share it with a friend or family member.
Step 1
Step 2
Take your time. You don’t have to exactly follow my guide. Be creative.
*note my guide image was the original image from the coloring craft, not the simplified one I created after finishing this craft.
Step 3
You can try to cut the tissue paper into specific sections or just randomly apply the paper. Don’t worry about the paper folding or overlapping. it will look neat on the finished craft. (See final example)
Step 4
Back side view and front side view of finished craft

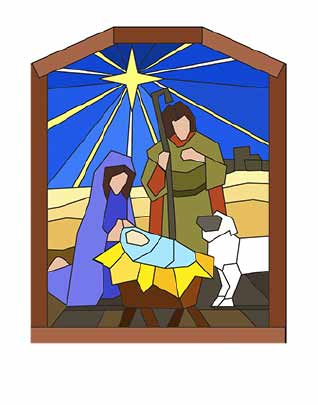
The story of Jesus’ birth can be found in Luke 2:1-20. Is there someone you can share this good news and this craft with?

“For there is born to you this day in the city of David a Savior, who is Christ the Lord.””
– Luke 2:11